


Overview
The Computer Incident Response Center Luxembourg (CIRCL) is the CERT for the private sector, communes and non-governmental entities in Luxembourg.
CIRCL provides useful tools and services like MISP1, DMA2, Passive DNS3, Passive SSL4 and URL Abuse5 which could be used free of charge by its constituency and the CERT/CSIRT community. All services except URL Abuse need registration to obtain login credentials.
The CIRCL-SOPs aims to show how to work with the provided services in case of a suspicion or an attack. This procedures are intended for security teams and CERTs/CSIRTs.
Disclaimer
When dealing with suspicious files, you will get in contact with potentially malicious files. Take precautions to prevent accidental execution of such files. Only handle them in a controlled environment. Be aware of the consequences and your responsibilities. Even if we are encourage you to identify malicious files in your environment and to submit them for analysis to CIRCL: you take the responsibility for your own actions.
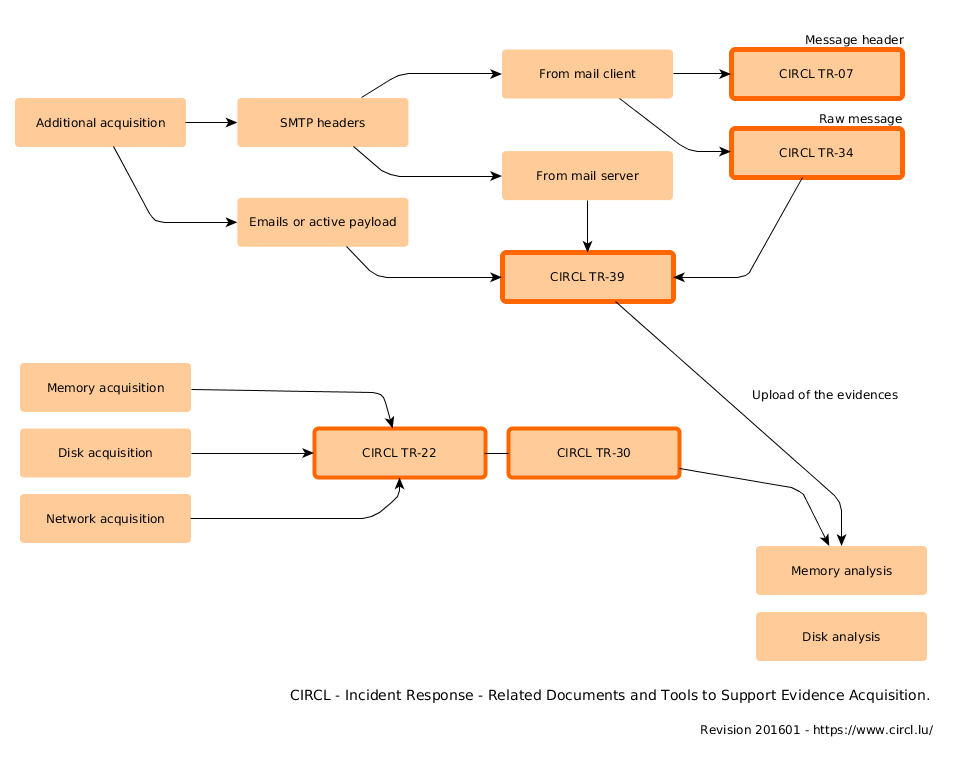
Content
- Attack vector: Malware Email
- Upload evidences
Attack vector: Malware Email
It often appears that an email with an attachment is not detected by the Antivirus sofware as being malicious. Often these attachments are ZIP files containing a malicious executable or an infected document. An alternative to an attachment could be a malicious link, which points to a remote location of the malicious file.
Check URL Abuse report
If the email contains a link, copy and paste it into URL Abuse for review. URL Abuse creates a report about the URL and the redirections and queries several blacklists for the presence of the URL. This gives a first indication if the link is malicious and where it redirects to, e.g. an executable file.
Gather VirusTotal information
Download the malware onto a host dedicated to analyse malware. If the file is an archive, then unpack it. Calculate the MD5 value of all the files and check on VirusTotal.com if the MD5 values are already detected as malicious or still unknown. In case you have a link, also check the report on VirusTotal. Try to understand if the Virus detections are meaningful, e.g. if the reports congruently report the same detection or if there are many heuristic based detections.
DMA upload
Upload the file to DMA for an automated analysis. The analysis will take some minutes. After the analysis is finished, DMA generates a link to the report.
Study the report very carefully to identify the behavior. Were some files dropped? Did the malware try to access resources in the Internet? Were some registry keys modified?
If the result of the analysis is not clear, you can try to upload the file onto another virtual host with another DMA profile. If necessary request CIRCL to do a manual analysis of the file.
Search for IOCs
At this point you will have some Indicators Of Compromise (IOCs) in form of IP addresses, URLs, MD5 and SHA-1 values and any other forms. These indicators can be used to review your logs (Firewall, Proxy, …) and to potentially detect infected systems within your infrastructure.
Share your IOCs
Sharing is a key element for detecting intrusions.
There are two major benefits to share your Indicators of Compromise with the community into MISP1 :
- Others can detect similar threat in their network
- You can benefit from the correlations between similar events and discover more information about the reported threat
To share IOC, you must login into MISP1, create a new event and add the attributes (indicators).
Links
- Request access to CIRCL services
- Malware Information Sharing Platform
- Dynamic Malware Analysis Platform
- Passive DNS
- Passive SSL
- URL Abuse Testing
Upload evidences
In the case of an incident, CIRCL provides a solution to securely upload and exchange evidences over SFTP.
This is the procedures to properly setup your environment for the file exchange over SFTP. It also covers instructions to setup and configure an SFTP client for Windows.
Incidents are handled individually and users will receive instructions on how to proceed after the setup is completed.
In addition to the instructions, the incident reporter will receive dedicated configuration parameters like username, SFTP server name and server key fingerprint which are required to setup the connection.
SFTP client
Linux/Unix/MAC OSX users already have an OpenSSH SFTP client installed on their system by default. Windows users have to rely on a 3rd party product. In the past we have had good experience with PuTTY 6, an SSH client which also provides an SFTP client.
To get the PuTTY client go to the quoted download site and download at least two files: “psftp.exe”, which is the client itself and “puttygen.exe”, which is required to generate the key pair. As an alternative we propose to download “putty.zip” which contains all tools of the PuTTY suite in one file.
We highly advice you to validate the cryptographically signed checksums of the downloaded files. Please follow the instructions on the download site to do so.
Be aware that “puttygen.exe” only supports RSA and DSA keys, which is sufficient. If you require ECDSA or ED25519 keys, the latest development snapshot will provide the feature.
Generating a public/private key pair
Linux/Unix/OSX: The OpenSSH tool to generate a public/private key pair is called “ssh-keygen”.
Example:
ssh-keygen -b 2048 -t rsa -f test

* -b 2048       Generate a 2048 bit key;
* -t rsa        Generate a key of the type RSA;
* -f test       Safe the private key with filename "test";
                The filename will be "test.pub";
You have to enter a passphrase to protect the private key. The file name of the private key will be “test” and the file name of the public key will be “test.pub”.
Store the private key in a safe place and submit the corresponding public key to CIRCL.
PuTTY: Open “puttygen.exe” to launch the PuTTY Key Generator which is initially empty. Select the key type you prefer, either SSH-2 RSA or SSH-2 DSA. SSH-1 is not supported by the CIRCL SFTP server. The number of bits in a generated key should be at least 2048. Press the “Generate” button and follow the instructions to generate the key pair.
Generate a passphrase to protect the private key and save it in a secure place.
Use your mouse to select all the public key from the window “Public key for pasting into OpenSSH authorized_keys file” and press CTRL + c to copy it into the clipboard. In your email client press CTRL + v to paste the public key in and send it to CIRCL. As an alternative save the public key and submit it to CIRCL.
Launch the SFTP client
PuTTY: PuTTY provides the command line tool “psftp” to connect to the SFTP server.
Example:
C:\putty>psftp.exe -2 -i C:\priv.ppk <username>@<sftp-host>

* -2            Force the use of SSH-2;
* -i <priv.pkk> Option -i followed by the path to your private key file;
* <username>    The received username from CIRCL after your incident report;
* <sftp-host>   The received hostname from CIRCL after your incident report;
You have to unlock the private key with the password you set earlier during this procedure.
Linux/Unix/OSX: OpenSSH provides the command line tool “sftp” to connect to the SFTP server.
Example:
sftp -2 -i <test> <username>@<sftp-host>

* -2            Force the use of SSH-2;
* -i <test>     Option -i followed by the path of your private key file;
* <username>    The received username from CIRCL after your incident report;
* <sftp-host>   The received hostname from CIRCL after your incident report;
You have to unlock the private key with the password you set earlier during this procedure.
Connect to the SFTP client
If the client successfully connects, the server will present you its own server key fingerprint. Please compare carefully this fingerprint with the fingerprint you received from CIRCL after your incident report.
Only if both fingerprints match you can be sure that you are connected to the correct server. Accept the connection only in this case. Abort the process at this stage if you have any uncertainty. Otherwise, you are ready to upload the evidences.
Follow the instructions you received from CIRCL after your incident report to upload the evidences.
Links
Revision
- Version 0.2 - TLP:WHITE - Evidence upload added + IOC sharing (20150730)
- Version 0.1 - TLP:WHITE - First version (20150703)