Last modified: Wed Oct 02 2024 16:09:21 GMT+0200 (Central European Summer Time)
- Using the system
- Creating an event
- Add attributes to the event
- Add Attribute
- Add Object
- Create and manage Sharing Groups
- Populate from Template
- Freetext Import Tool
- Attribute Replace Tool
- Add attachments to the event
- Propose a change to an event that belongs to another organisation
- Populate from OpenIOC
- Populate from ThreatConnect
- Adding IOCs from a PDF report
- Publish an event
- Browsing past events
- Updating and modifying events and attributes
- Tagging
- Templating
- Contacting the reporter
- Automation
- Exporting data
- Connecting to other instances
- Rest API
Using the system
Creating an event
The process of entering an event can be split into 3 phases, the creation of the event itself, populating it with attributes and attachments and finally publishing it.
During this first step, you will create a basic event without any actual attributes, but storing general information such as a description, time and risk level of the incident. To start creating the event, click on the New Event button on the left and fill out the form you are presented with. The following fields need to be filled out:

- Date: The date when the incident has happened. Just click this field and a date-picker will pop up where you can select the desired date.
- Distribution: This setting controls, who will be able to see this event once it becomes published and eventually when it becomes pulled. Apart from being able to set which users on this server are allowed to see the event, this also controls whether the event will be synchronised to other servers or not. The distribution is inherited by attributes: the most restrictive setting wins. The following options are available:
- Your organization only: This setting will only allow members of your organisation to see this. It can be pulled to another instance by one of your organisation members where only your organisation will be able to see it. Events with this setting will not be synchronised. Upon push: do not push. Upon pull : pull.
- This Community-only: Users that are part of your MISP community will be able to see the event. This includes your own organisation, organisations on this MISP server and organisations running MISP servers that synchronise with this server. Any other organisations connected to such linked servers will be restricted from seeing the event. Upon push: do not push. Upon pull: pull and downgrade to Your organization only.
- Connected communities: Users that are part of your MISP community will be able to see the event. This includes all organisations on this MISP server, all organisations on MISP servers synchronising with this server and the hosting organisations of servers that connect to those afore mentioned servers (so basically any server that is 2 hops away from this one). Any other organisations connected to linked servers that are 2 hops away from this own will be restricted from seeing the event. Upon push: downgrade to This Community only and push. Upon pull: pull and downgrade to This Community only.
- All communities: This will share the event with all MISP communities, allowing the event to be freely propagated from one server to the next. Upon push: push. Upon pull: pull.
- Sharing group: This will share the event to the defined sharing group. This includes only the organisations defined in the sharing group. The distribution can be local and cross-instance depending of the sharing group definition. For more information on sharing groups, refer to the sharing group section.
- Threat Level: This field indicates the risk level of the event. Incidents can be categorised into three different threat categories (low, medium, high). This field can alternatively be left as undefined. The 3 options are:
- Low: General mass malware.
- Medium: Advanced Persistent Threats (APT)
- High: Sophisticated APTs and 0day attacks.
- Analysis: Indicates the current stage of the analysis for the event, with the following possible options:
- Initial: The analysis is just beginning
- Ongoing: The analysis is in progress
- Completed: The analysis is complete
- Event Description: The info field, where the malware/incident can get a brief description starting with the internal reference. This field should be as brief and concise as possible, the more detailed description happens through attributes in the next stage of the event's creation. Keep in mind that the system will automatically replace detected text strings that match a regular expression entry set up by your server's administrator(s).
- GFI Sandbox: It is possible to upload the exported .zip file from GFI sandbox with the help of this tool. These will be dissected by the MISP and a list of attributes and attachments will automatically be generated from the .zip file. Whilst this does most of the work needed to be done in the second step of the event's creation, it is important to manually look over all the data that is being entered.
Add attributes to the event
The second step of creating an event is to populate it with attributes and attachments. This can be done by adding them manually or importing the attributes from an external format (OpenIOC, ThreatConnect). To import from an external format or to upload an attachment use the options in the menu on the left.
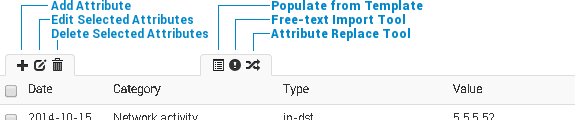
Using the above shown buttons, you can populate an event using various tools that will be explained in the following section. Let's start with the Add Attribute button.
Add Attribute
Keep in mind that the system searches for regular expressions in the value field of all attributes when entered, replacing detected strings within it as set up by the server's administrator (for example to enforce standardised capitalisation in paths for event correlation or to bring exact paths to a standardised format). The following fields need to be filled out:
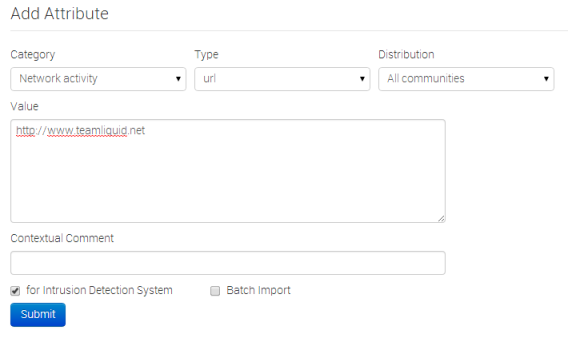
- Category: This drop-down menu explains the category of the attribute, meaning what aspect of the malware this attribute is describing. This could mean the persistence mechanisms of the malware or network activity, etc. For a list of valid categories, click here
- Type: Whilst categories determine what aspect of an event they are describing, the Type explains by what means that aspect is being described. As an example, the source IP address of an attack, a source e-mail address or a file sent through an attachment can all describe the payload delivery of a malware. These would be the types of attributes with the category of payload deliver. For an explanation of what each of the types looks like together with the valid combinations of categories and types, click here
- Distribution: This drop-down list allows you to control who will be able to see this attribute. The distribution is inherited by attributes: the most restrictive setting wins. For more info, read the distribution information in the creating an event section - click here
- Value: The actual value of the attribute, enter data about the value based on what is valid for the chosen attribute type. For example, for an attribute of type ip-src (source IP address), 11.11.11.11 would be a valid value. For more information on types and values, click here
- Contextual Comment: You can add some comments to the attribute that will not be used for correlation but instead serves as purely an informational field.
- For Intrusion Detection System: This option allows the attribute to be used as an IDS signature when exporting the NIDS data, unless it is being overruled by the allowedlist. For more information about the allowedlist, head over to the administration section. If the IDS flag is not set, the attribute is considered as contextual information and not to be used for automatic detection.
- Batch import: If there are several attributes of the same type to enter (such as a list of IP addresses, it is possible to enter them all into the same value-field, separated by a line break between each line. This will allow the system to create separate lines for the each attribute.
Add Object
Please have a look at the MISP objects chapter
Create and manage Sharing Groups
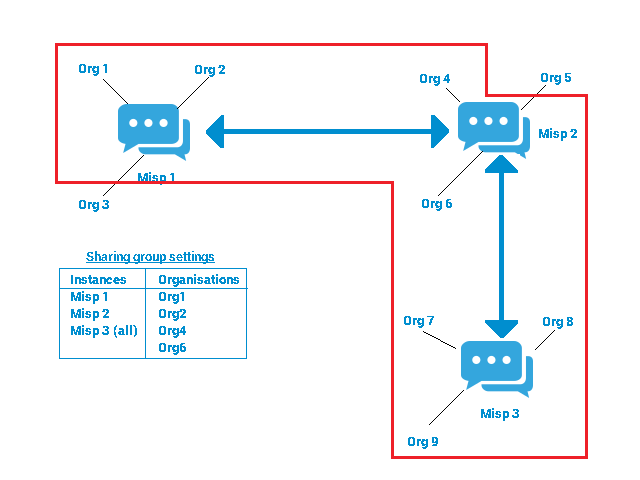
Sharing groups in MISP are a more granular way to create re-usable distribution lists for events/attributes that allow users to include organisations from their own instance (local organisations) as well as organisations from directly, or indirectly connected instances (external organisations). Sharing groups can be created by any user that has the sharing group editor permission. Additionally, sharing groups can be edited by any user that has the aforementioned permission in addition to being a member of the sharing group's creating organisation, or any organisation that is marked as an "extender" of the sharing group. The main use for the extend feature is delegating the rights to add users to trusted partners. For example, when sharing with a different industry sector, knowing all actors that should receive the information is often not possible, so delegating the rights to extend the event to a trusted representative of said sector would allow for someone with more insight to find and add the proper list of partners for the sharing group.
The most general use-cases for sharing groups are creating re-usable topical subgroups in MISP that share events or for ad-hoc sharing scenarios (such as several organisations involved in a specific incident wanting to work together). Generally sharing groups add a level of complexity for the users involved as well as a performance overhead on the data marked with it.
As a best-practice recommendation, using traditional distribution methods is preferred unless they cannot cover the given use-case. Also, whilst sharing groups can be assigned to both events and attributes, it is highly recommended to use the special "inherit" distribution setting on attributes whenever the attribute's sharing group would match the event's.
Sharing groups consist of the following elements, each of which has its own page in the sharing group creator/editor tool (accessed via the Global actions -> List Sharing Groups and Add Sharing Group functionalities):
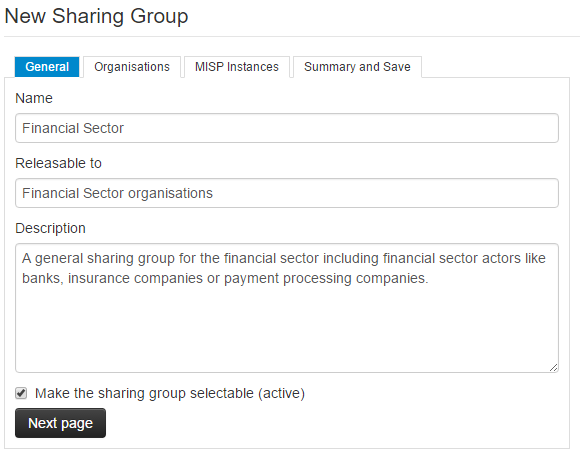
- General: Metadata describing the intent of the sharing group
- Name: The unique name of the sharing group.
- Releasable to: A human-readable description of who data marked with the sharing group is shareable with. This field is NOT used by MISP for anything besides for being an informational field aimed at extender organisations of the sharing group.
- Description: A natural-text representation of the intent of the sharing group.
- Make the sharing group selectable (active): A sharing group can be made passive by unchecking this setting. All events and attributes will continue to adhere to a passive sharing group's distribution setting, however, the sharing group will not be offered as a selectable option when setting the distribution of events/attributes. The idea behind this is that ad-hoc sharing groups that have outlived their purpose can be retired in order to reduce the clutter in the UI.
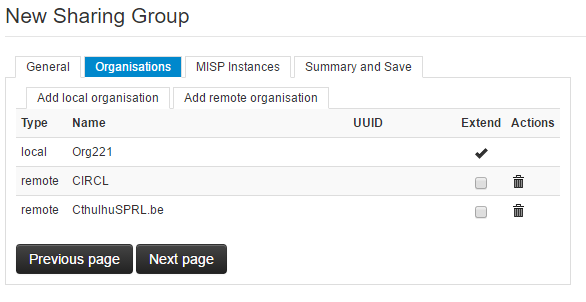
- Organisations: The second page of the tool contains the distribution list containing all organisations directly named as a member of the sharing group
- Add Local/remote organisations: The organisations are split into two lists (shown as two tabs in the tool) for local and known remote/external organisations. Local organisations are expected to have at least one local user on the instance whilst remote organisations do not. Synchronising with remote instances will create remote organisations whenever a new event is received of a yet unknown organisation. Remote organisations can always be converted to local organisations - this becomes interesting if a user of an external organisation requests access to your MISP instance.
- Extend checkmark: Checking the extend checkmark makes the selected organisation an extender of the sharing group, meaning they can edit the sharing group. It is expected of these trusted partners that they adhere to the "releasable to" tag set on the general page. The organisation creating the sharing group is always included as an extender.
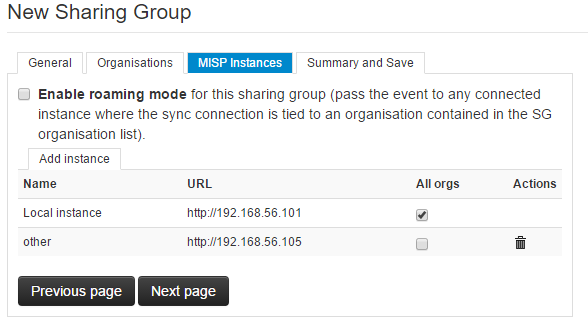
- Servers: The third page of the tool describes the MISP instances the data marked with the given sharing group are allowed to be synchronised with. Keep in mind that any user that can view an event on a given instance will have the right to pull the event to their home instance, as they are part of the sharing group, however the organisation distribution list will still apply.
- Enable roaming mode: This setting will disable the server list and rely purely on the organisation list to distribute the data. If a sync connection's host organisation is in the organisation distribution list the instance becomes eligible for synchronising the data marked with the sharing group. Generally this carries a slightly higher risk as it relies on administrators correctly setting up the host organisation settings, but it removes the need to know the specific instance urls where the event/attribute should flow.
- Add instance: Add an instance to the distribution list from the sync instances set up under sync actions -> servers
- All orgs: Checking this checkmark will automatically include all organisations on the given instance in the sharing group. This means that in order to exchange with all users of a linked community, one does not need to know every organisation residing on the instance. This also means that the distribution list will not include the organisation names, which can be interesting for certain privacy sensitive communities.

- Summary: Once everything is set up, MISP will summarise the sharing group in a highlighted text page, which is highly advised to be reviewed before submiting the new sharing group/editing the sharing group. Mistakes in the sharing group settings can lead to organisations that should not be involved in the sharing group getting access or organisations receiving unwanted editing rights to the sharing group. Keep in mind that even if you have submitted a sharing group, it is not propagated until an event/attribute receives the sharing group as the selected distribution.
Populate from Template
Templates allow users to rapidly populate events of a specific type by filling out a series of pre-defined fields. Users with template creation privileges can create new templates for their organisations or for all organisations on their instance. If you are interested in template creation, please refer to the templating section. For users trying to populate an event, after clicking on the populate from template button, you'll be presented with a list of all currently accessible templates. Pick the one that best describes the event that you are creating.

Once you have chosen a template, you'll be presented with the actual form contained within. Make sure you fill out as many fields as possible with the mandatory fields - marked by a star in a bracket such as this: (*) - are filled out. Templates are divided into sections, with each section having a title and a description in addition to a series of fields. Each field can be an attribute or a file attachment field. An attribute field has the following components:
- Field: The name of the field along with an indication if the field is mandatory.
- Description: A short description of the field.
- Types: The value(s) that are valid for the field. In the case of several types being shown here, you can enter value(s) matching any one of the types, or in the case of a batch import field, any mixture of the given types.
- Text field: This field can either be a single line textfield or a multi-line text area. For the former, enter a single value of the above indicated type, whilst for the latter you can paste a list of values separated by line-breaks.
Freetext Import Tool

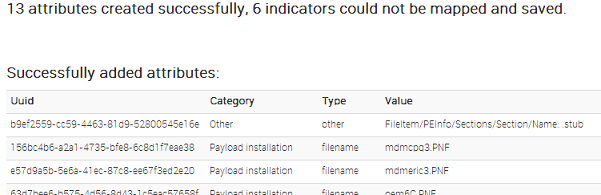
If you have a list of indicators that you would like to quickly generate attributes out of then the Free-text import tool is just what you need. Simply paste a list of indicators (separated by line-breaks into this tool).
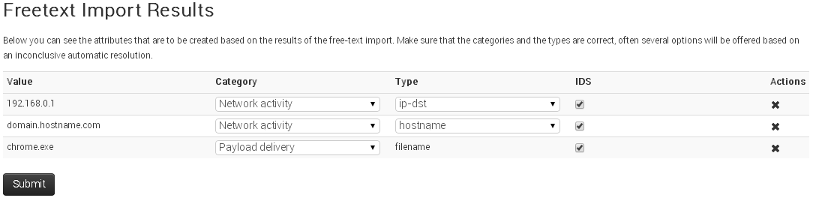
Since there are several category / type combinations that can be valid for a lot of values, MISP will suggest the most common settings. You can alter the category / type / IDS fields manually if you disagree with the results. The options will be restricted to valid category/type combinations for the value that you have entered.
If any correlation is already found, these correlations will be displayed in the result page.
Attribute Replace Tool
If you would like to create and maintain an event with a set of indicators that receives removals and additions over time, then the attribute replace tool might make this task easier for you.
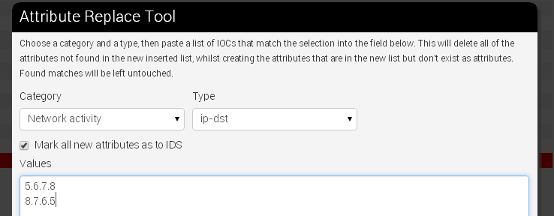
Simply select the desired category / type combination, choose whether the attributes should be marked for IDS exports and paste the new list of indicators into the textarea. Attributes of the same category/type that are present in the event but not the new list will be removed, values in the pasted list that do not yet exist as attributes will be created as attributes and values that already have matching attributes will be left untouched.
Add attachments to the event
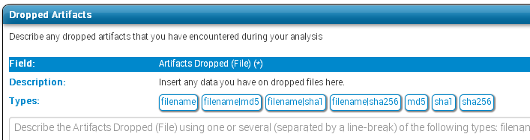
You can also upload attachments, such as the malware itself, report files from external analysis or simply artifacts dropped by the malware. Clicking on the add attachment button brings up a form that allows you to quickly attach a file to the event. The following fields need to be filled out:
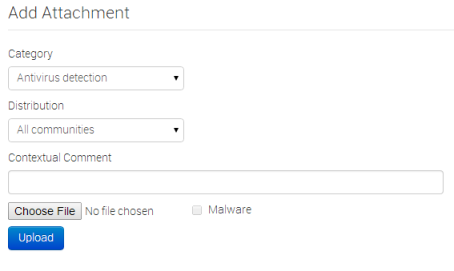
- Category: The category is the same as with the attributes, it answers the question of what the uploaded file is meant to describe.
- Distribution: This drop-down list allows you to control who will be able to see this attachment. The distribution is inherited by attributes: the most restrictive setting wins. For more info, refer to the distribution information in the event section.
- Upload field: By hitting browse, you can browse your file system and point the uploader to the file that you want to attach to the attribute. This will then be uploaded when the upload button is pushed.
- Malware: This check-box marks the file as malware and as such it will be zipped and passworded, to protect the users of the system from accidentally downloading and executing the file. Make sure to tick this if you suspect that the filed is infected, before uploading it.
- Contextual Comment: You can add some comments to the attribute that will not be used for correlation but instead serves as purely an informational field.
Propose a change to an event that belongs to another organisation
If you would like to propose a modification to an attribute, or to propose some additional attributes to the creating organisation, you can do this with the buttons that replace the add attribute field on the left and the edit icon on the right end of each listed attribute in the event view. The creating organisation of the event will be able to see any proposals and discard or accept the changes.

If the organisation that has created the event is on another connected server, they will be able to accept the proposal once they initiate a pull and receive your proposal. After this they can republish the event, sending the altered attribute back to your instance.
Populate from OpenIOC
It is also possible to attempt to import the data contained in a .ioc file, The import tool will attempt to gather as many IndicatorItems within nested logical operators as possible without breaking their validity. After the procedure is done, you'll be presented with a list of successfully created attributes and a list of failed IndicatorItems as well as a graph of the .ioc file.

Populate from ThreatConnect
You can also import the data from a ThreatConnect export csv file. The following columns are used by the import tool (and are thus mandatory fields to select during the export):
- Type
- Value
- Confidence
- Description
- Source
The result will be a list of attributes that get added to the currently selected event, each of which will be marked with a comment that indicates that its origin being from a ThreatConnect import.
Adding IOCs from a PDF report
You can use a generic script called IOC parser or use a script published by Palo Alto to convert IOC parser output to a MISP event: [report_to_misp] (https://github.com/PaloAltoNetworks-BD/report_to_misp/).
Publish an event
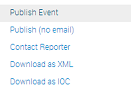
Once all the attributes and attachments that you want to include with the event are uploaded / set, it is time to finalise its creation by publishing the event (click on publish event in the event view). This will alert the eligible users of it (based on the private-controls of the event and its attributes/attachments and whether they have auto-alert turned on), push the event to instances that your instance connects to and propagate it further based on the distribution rules. It also readies the network related attributes for NIDS signature creation (through the NIDS signature export feature, for more information, go to the export section.). There is an alternate way of publishing an event without alerting any other users, by using the "publish (no email)" button. This should only be used for minor edits (such as correcting a typo).
If your instance has background jobs enabled then the event might not get published immediately.
Browsing past events
The MISP interface allows the user to have an overview over or to search for events and attributes of events that are already stored in the system in various ways.
To list all events
On the left menu bar, the option "List events" will generate a list of the last 60 events. While the attributes themselves aren't shown in this view, the following pieces of information can be seen:
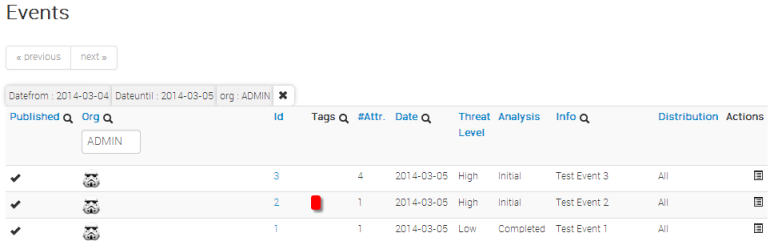
- Published: Already published events are marked by a checkmark. Unpublished events are marked by a cross.
- Org: The organisation that created the event.
- Owner Org: The organisation that owns the event on this instance. This field is only visible to administrators.
- ID: The event's ID number, assigned by the system when the event was first entered (or in the case of an event that was synchronized, when it was first copied over - more on synchronisation in chapter xy)
- Tags: Tags that are assigned to this event.
- #Attr.: The number of attributes that the event has.
- Email: The e-mail address of the event's reporter. This is not visible to regular users. Organisation administrators can see the e-mail addresses of their own organisation's users.
- Date: The date of the attack.
- Threat Level: The risk level of the attack, the following levels are possible:
- Low: General Malware
- Medium: Advanced Persistent Threats (APTs)
- High: Sophisticated APTs and 0day exploits
- Undefined: This field can be left undefined and edited at a later date.
- Analysis: Indicates the current stage of the analysis for the event, with the following possible options:
- Initial: The analysis is just beginning
- Ongoing: The analysis is in progress
- Completed: The analysis is complete
- Info: A short description of the event, starting with an internal reference number.
- Distribution: This field indicates what the sharing privileges of the event. For details, refer to the distribution information in the event section.
- Actions: The controls that the user has to view or modify the event. The possible actions that are available (depending on user privileges - click here to find out more about privileges):
- Publish: Publishing an event will have several effects: The system will e-mail all eligible users that have auto-alert turned on (and having the needed privileges for the event, depending on its private classification) with a description of your newly published event, it will be flagged as published and it will be pushed to all eligible servers (to read more about synchronisation between servers, have a look at the section on connecting servers
- Edit: Clicking on the edit button will bring up the same same screen as the one used for creating new events, with the exception that all fields come filled out with the data of the event that is being edited. The distribution of an event can only be edited if you are a user of the creating organisation of the event. For more information on this view, refer to the section on creating an event.
- Delete: The system will prompt you before erasing the unwanted event.
- View: Will bring up the event view, which besides the basic information contained in the event list, will also include the following:
Filters
It is also possible to filter the events shown by clicking on the small magnifying glass icons next to the field names and entering a filter term.
Event view
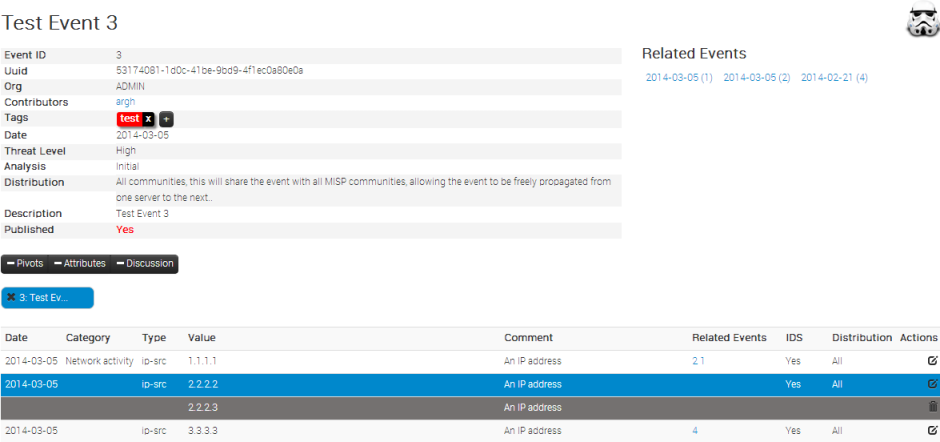
General Event Information
- ID: The ID of the event.
- Uuid: In order to avoid collisions between events and attributes (during for example a sync) a Uuid is assigned that uniquely identifies each of them.
- Org The organisation that has originally created the event. The logo (if it exists on the server, alternatively a string) representing the organisation is also shown int he right upper corner.
- Contributors: Shows a list of the organisations that have contributed to the event via proposals. If you click any of the logos listed here, you'll get redirected to a filtered event history view, including only the changes made by the organisation.
- Tags: A list of tags associated with the event. Clicking a tag will show a list of events with the same tag attached. The little cross next to each tag allows you to remove the tag from the event, whilst the '+' button allows you to assign a tag. For the latter two options to be visible, you have to have tagging permission.
- Date: The date of detection, set by the user that creates the event, not to be confused with the creation date of the event.
- Threat Level: The assigned threat level of the event.
- Analysis: The status of the analysis.
- Distribution: This shows the distribution rules applied to this event, controlling whether only the creating organisation can see (Your organisation only) it or everyone on the instance (This community only). The two remaining settings allow the event to be propagated to organisations on remote connected instances.
- Info: A short description of the event itself. Make sure not to put information in here that could be used for correlation purposes and be better suited as an Attribute.
- Published: Whether the event has been published or not. Publishing allows the attributes of the event to be used for all eligible exports and it notifies users that have subscribed to the event alerts. Also, a publish initiates a push to all eligible instances.
List of Related Events The list of relations is shown on the right hand side of the general event information. Events can be related by having one or more attributes that are exact matches. For example, if two events both contain a source IP attribute of 11.11.11.11 then they are related. The list of events that are related the currently shown one, are listed under "Related Events", as links (titled the related event's date and ID number) to the events themselves.
Data Element Toggles You can control some of the data that is shown on this page using three toggles. The elements that can be disabled are the pivot threads, the attributes (and proposals) and the Discussions. You can collapse these elements and then expand them again using the same button.
Pivot Threads While moving from event to event through the relation links (a process that we refer to as pivoting), you create a path that shows which events you have traversed. This path is reset by leaving the event view and navigating elsewhere in the application or by deleting the root pivot element. Each event visited is represented by a bubble in the pivot thread graph, connected by lines that show how the user has arrived at the next connected event. It is possible to jump back to an earlier relation and pivot to another event through that, creating branches in the graph. The currently selected event is coloured blue in the graph. If you would like to delete an element from the graph (including all of elements that branch off of it) just click on the small x within a pivot bubble. For a deletion to be possible the following conditions have to be met:
- The pivot element to be deleted cannot be on the path that leads to the currently selected event
- The pivot element residing in the graph's root can always be deleted - this will simply reset the current pivot thread
Attributes and Proposals A list of all attributes and proposals attached to the event. The fields for each of them only differ in the available actions and the fact that for proposals to attributes all fields are blank that would stay unchanged if the proposal was accepted (for example, proposing a change to an attribute to turn the IDS flag on will have all fields apart from the IDS flag blank in the proposal. Here is a list of what each of the fields represents:
- Date: The date of the last modification to the attribute. Proposals don't have a date of last edit.
- Category: The category of the attribute or proposal. For a list of possible categories visit the section on categories and types.
- Type: The type of the attribute or proposal. For a list of possible categories visit the section on categories and types.
- Value: The value or value-pair of the attribute. This is the main payload of the attribute, which is described by the category and type columns. For certain types of attributes that are made up of value-pairs the two parts will be split by a pipe (|), such as for filename|md5. The value field(s) are used by the correlation engine to find relations between events. In value-pair attributes both values are correlated individually.
- Comment: Attributes can have a contextual comment to further describe the attribute. These comments are not used for correlation and are purely informative.
- Related Events: A list of the event IDs that also contain an attribute with the same value.
- IDS: Flags an attribute as an indicator of compromise, allowing it to be included in all of the eligible exports.
- Distribution: Defines the distribution of the attribute individually. An attribute can have a different distribution level than the event. In any case, the lowest distribution level of the two is used.
- Actions: The user can interact with the events through these buttons, which will be further described in the next portion of the guide as they differ for attributes and proposals.
Depending on the colour coding of the row, you can have an attribute, a proposal to the event or a proposal to an attribute:
- Attributes: Each uncoloured line represents an Attribute.
- Proposals to an Event: Each gray line at the end of the list represents a Proposal to an event. These are proposals for a new attribute, mostly unrelated to any of the currently existing attributes. If the creator of the event accepts one of these a new attribute will be created.
- Proposals to an Attribute: Each attribute can have several edit proposals. These will be placed right below the attribute that the proposal affects and - as with the event proposals - is coloured grey. The original attribute's row is coloured blue if a proposal exists for it.
Using the modify button will bring up the attribute creation view, with all data filled out with the attribute's currently stored data.
Event Discussion Thread
Each event has its own assigned discussion where users (that are eligible to see the event) can participate in an open discussion. The users are anonymised in the messages, all that other users will see is their user ID number and their organisation. To post a message on the Event Discussion, either use the reply button on a previous post or use the quickresponse field at the bottom of the page. Each post is made up of the following:
- Date:The date when the post was created.
- Post navigation:This should the post's ID as well as a link to jump to the top of the discussion thread on the page itself.
- Organisation logo:If such an image exists for the organisation that has posted the message, then the logo is shown.
- Message:The body of the post itself. This can also include automatically generated links to other events and threads as well as show quoted test in embedded bubbles. Editing an event will also append a post with a message indicating that it was edited together with the timestamp of the edit.
- User:The e-mail address of the poster if he/she is from the organisation as the current user. Alternatively a generated sting is shown that includes the user ID of the user, so that his/her e-mail address could remain hidden whilst still being identifiable.
- Action buttons:Edit, Delete and Reply. The first two of the three options are only available to the poster of the message or a site admin. Quoting a post will automatically include the original message in [quote] tags.
Here is a list of the various tools you can use while using this feature:
- Pagination: There are 5 posts visible on each event page, if there have been more messages posted, use the previous and next button to navigate through the thread. This will not reload the rest of the page.
- Discussion Tags: Users can quote something by encapsulating it in [quote][/quote] tags, they can create a link to another event with the [event][/event] tags or to another discussion thread with [thread][/thread].
- Quick Post: Adding a post will take the user to a separate add Post page, something that can be a bit of an inconvenience. To avoid this, there is a quick post button, where users can add messages on the fly without having to reload the page. On top of the quick post field, 3 buttons allow users to generate quote, event and thread tags quickly.
Event History
View the logs of the event that show how the event has changed over time, including the contribution from other organisations in the form of proposals. There are two ways to get to this view, either by clicking on View Event History on the side menu of an event view, or by clicking on a contribing organisation's logo on the event view. The latter will show a restricted form of the logs, showing only Proposals created by the selected organisation. The fields shown in this view are as described as follows:
- Org: The logo (or in the lack thereof a string representation) of the organisation.
- Action: Each entry in the log happens during an action, such as the creation, modification or deletion of data and some special actions (such as accepting a proposal). This field shows which action caused the entry to be created.
- Model: As described above, a log entry is generated on certain actions. This field shows which type of data was affected that caused the log entry to be created (such as a change to the event, the creation of an attribute, the discarding of a proposal, etc).
- Title: This is a short description of the change itself and it is not nearly as detailed as the information administrators get in the audit logs. However, for attributes and proposals the category / type and value of the created or edited attribute is shown.
- Created: The date and time of the log entry's creation.
Listing all attributes
Apart from having a list of all the events, it is also possible to get a list of all the stored attributes in the system by clicking on the list attributes button. The produced list of attributes will include the followings fields:
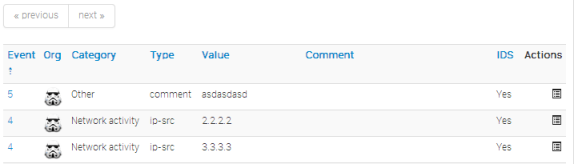
- Event: This is the ID number of the event that the attribute is tied to. If an event belongs to your organisation, then this field will be coloured red.
- Org: The organisation that has created the event.
- Category: The category of the attribute, showing what the attribute describes (for example the malware's payload). For more information on categories, go to section xy
- Type: The type of the value contained in the attribute (for example a source IP address). For more information on types, go to section xy
- Value: The actual value of the attribute, describing an aspect, defined by the category and type fields of the malware (for example 11.11.11.11).
- Comment: An optional contextual comment attached to the attribute.
- IDS: Shows whether the attribute has been flagged for NIDS signature generation or not.
- Actions: A set of buttons that allow you to view the event that the attribute is tied to, to edit the attribute (using the same view as what is used to set up attributes, but filled out with the attribute's current data) and a delete button.
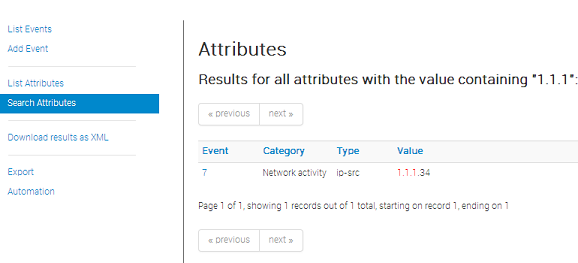
Searching for attributes
Apart from being able to list all events, it is also possible to search for data contained in the value field of an attribute, by clicking on the "Search Attributes" button.

This will bring up a form that lets you enter one or several search strings (separate search strings with line breaks) that will be compared to the values of all attributes, along with options to narrow down the search based on category and type. The entered search string has to be an exact match with (the sub-string of) a value. A second text field makes it possible to enter event IDs for events that should be excluded from the search (again, each line represents an event ID to be excluded). The third text field allows the user to restrict the results to attributes from certain organisations or to attributes not created by certain other organisations, using the above described syntax. The list generated by the search will look exactly the same as listing all attributes, except that only the attributes that matched the search criteria will be listed (to find out more about the list attributes view, click here). The search parameters will be shown above the produced list and the search terms will be highlighted. The last option is a checkbox that restricts all of the results to attributes that are marked as IDS signatures.

Updating and modifying events and attributes
Every event and attribute can easily be edited. First of all it is important to find the event or attribute that is to be edited, using any of the methods mentioned in the section on browsing past events. Once it is found, the edit button (whether it be under actions when events/attributes get listed or simply on the event view) will bring up the same screen as what is used to create the entry of the same type (for an event it would be the event screen as seen here, for an attribute the attribute screen as described here). You can also simply double-click on the event you wish to edit and enter the edit mode. Keep in mind that editing any event (either directly or indirectly through an attribute) will unpublish it, meaning that you'll have to publish it (through the event view) again once you are done.
Tagging
As described earlier, users with tagging rights can arbitrarily tag events using tags chosen from a pool of available options. If you have tagging privileges and would like to create a new tag, navigate to Event Actions - Add Tag. You'll be presented with the following form:
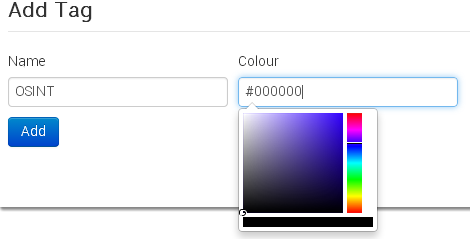
Fill out the following fields:
- Name: Pick a name for the tag. Try to use consistent naming conventions across your instance, to avoid confusion.
- Colour: You can choose a colour for the tag by clicking on the colour field and using the colour picker tool. Try to avoid having duplicate or similar looking colours to help avoid confusion.
Templating
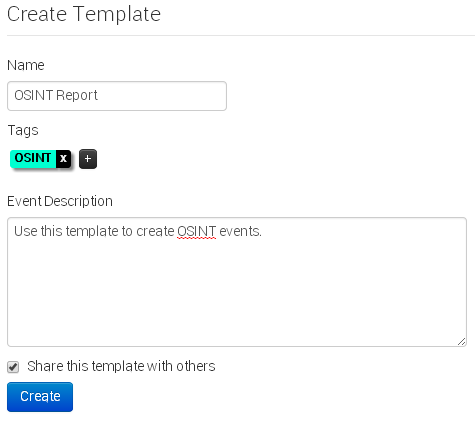
Newer users can easily be overwhelmed by having to manually populate events with attributes without any guidance. What sort of information should go into the event? What should be the category and type of a C2 IP? Templates allow users to use simple forms to populate events. Even though MISP ships with a few default templates, it is possible for users (with the appropriate templating privilege) to create new templates for their users or for all users of the instance. Let's look at how you can create a template. First go to Event Actions - Add Template to go to the event creation view.
The following fields have to be filled out:
- Name: The name of the template should describe what type of an event it should be used to generate attributes.
- Tags: You can attach tags to the template - an event populated using the template would automatically receive the tag(s). Add new tags using the + button. If you chnage your mind about a tag you can remove it with the cross next to the tag name.
- Event Description: A short description about the events that this template should be used for.
- Share this template with others: The template can be set to be usable by any organisation on the instance or only by the one that has created it.
Once the skeleton template is created, you can start populating the template with data. There are 3 types of elements that can be used during the creation of a template: attribute, file and text elements. Text elements divide the template into sections with an information field, followed by all of the attribute/file fields until a new text field is read. Don't worry about the order of the elements during creation, they can be re-arranged using drag & drop. Let's look at the 3 element types:
Attribute Element
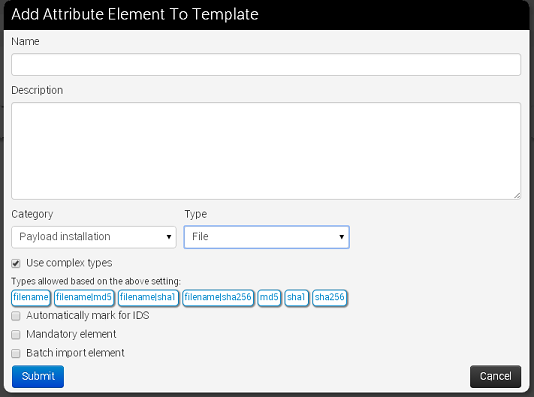
The following fields have to be filled out:
- Name: The field name that will be presented to the user.
- Description: A brief description of the element. Make sure that you provide sufficient information to the user to make it obvious what is expected.
- Category: The category used for any attributes created using this template element.
- Type: The type or complex type used for any attributes created using this template element. Complex types allow for several related types to be used on data entry. For example, a "file" complex type element allows for filenames and hashes.
- Use Complex types: If the category permits it, switch to a complex type using this checkbox.
- Automatically mark for IDS: If checked, any attributes generated using this element will be marked for IDS exporting.
- Mandatory element: If the elemnt is marked as mandatory, then the template form can only be submitted by users if this field is filled out.
- Batch import element: Allow for multiple values to be entered (separated by line breaks).
File Element
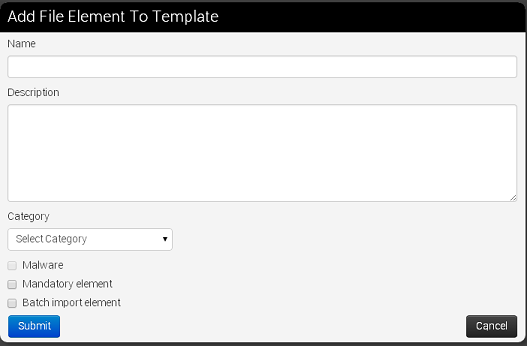
The following fields have to be filled out:
- Name: The field name that will be presented to the user.
- Description: A brief description of the element. Make sure that you provide sufficient information to the user to make it obvious what is expected.
- Category: The category to be used by all attachments uploaded through this element.
- Malware: If the uploaded files are malicious and should be encrypted and password protected, mark this checkbox.
- Mandatory element: If it should be required to upload an attachment, check this checkbox.
- Batch import element: Ticking this checkbox allows users to upload several files using this element.
Text Element
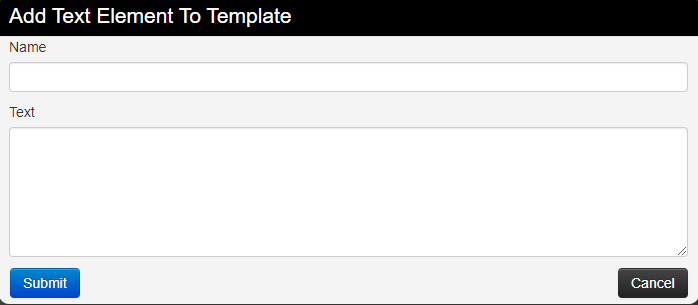
The following fields have to be filled out:
- Name: The name of the section that will be presented to the user.
- Text: The description of the section. Explain briefly to the user what the following attribute/file elements will be dealing with. There are several ways to split a template into sections, try to have ease of use in mind while creating it.
Contacting the reporter
To get in touch with the reporter of a previously registered event, just find the event for which you would like to contact the reporter by either finding it on the list of events, by finding it through one of its attributes or by finding it through a related event. Once the event is found and the event view opened, click the button titled "Contact Reporter". This will bring up a view where you can enter your message that is to be e-mailed to all members of the reporting organisation that subscribe to receiving such reports or the reporting user himself. Along with your message, the detailed information about the event in question will be included in the e-mail.
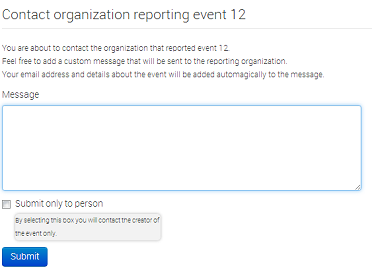
By default, the message will be sent to every member of the organisation that posted the event in the first place, but if you tick the check-box below the message field before sending the mail, only the person that reported the event will get e-mailed.
Automation
It is possible to quickly and conveniently export the data contained within the system using the automation features located in the main menu on the left (available to users with authentication key access only). There are various sets of data that can be exported, by using the authentication key provided by the system (also shown on the export page). If for whatever reason you would need to invalidate your current key and get a new one instead (for example due to the old one becoming compromised) just hit the reset link next to the authentication key in the export view or in your "my profile" view. To find out about the various export formats and the usage within the automation functions, please read the page on the API's usage.
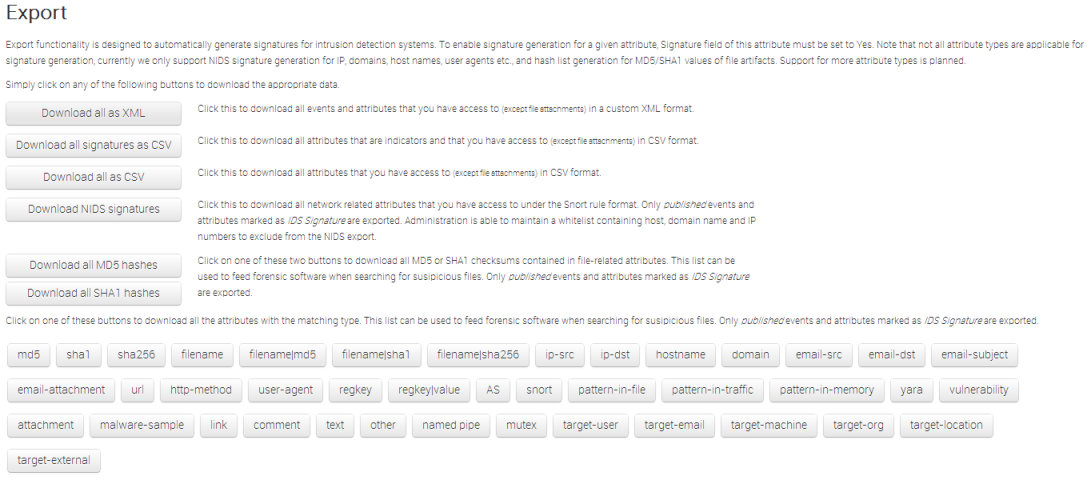
Exporting data
For users that do not have authentication key access, an alternate export feature is available that relies on your interactive login to the site. To access these, just use the export menu button to the left and you'll be presented with a list of export options. Depending on your server's configuration, you will be presented with one of two possible pages, depending on whether you have background processing enabled or not.
Export page with background jobs disabled
The page will list a set of export formats that you can immediately download as a file. Just click on the desired export format and MISP will start collecting all the data that you will receive in a file. Keep in mind that this can be a lengthy process. To avoid having to wait, consult with your instance's site administrator about enabling the background processing.
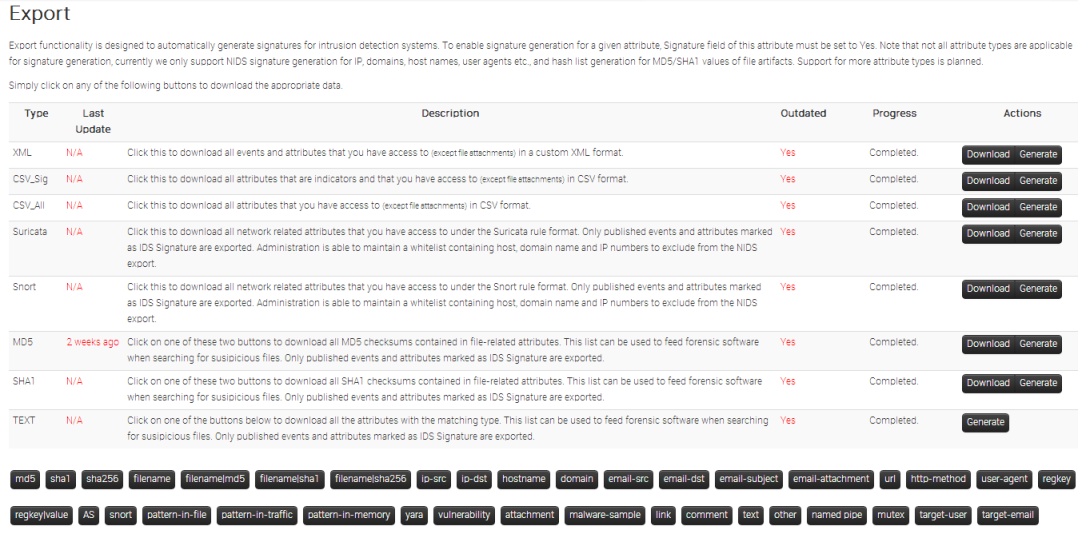
Export page with background jobs enabled
If the background jobs are enabled, you'll be redirected to a different version of the export page. Here you will see a table with all of the major export formats and the current status of the cached export files. Keep in mind that these are generated on an organisation by organisation basis, so even though others have generated newer export caches your organisation may have an outdated cache. You can simply issue a generate command (by clicking the "Generate" button) on the desired export type and the background workers will start fetching and assembling your cache. A progress bar will show the progress of the export process. Once done, you can click "Download" to download the freshly generated cache file. If the cache is already up to date from before, then you don't have to regenerate the cache, just click on the "download" button. You may have noticed that the TEXT export only has a generate button - this is because TEXT exports are made up of a lot of types of exports, all of which get generated together. To download any of these files, just click on any of the attribute types at the bottom of the table. A quick description of each of the fields in the table:
- Type: The type of the export (such as XML, Suricata, MD5, etc.).
- Last Update: The generation date of the current cache for the given export type.
- Description: A description of the export format.
- Outdated: This compares the cache generation date to the last timestamp when an event was updated and lets you know whether the cache is outdated or not.
- Progress: Shows the progress of the last initiated generation process.
- Actions: Download or Generate the given cache with these buttons.
Exporting search results and individual events
Apart from the options offered by the export pages, it's also possible to export all events involved in a search attribute result table, by using the "Download results as XML" button on the left menu bar.
Each event's view has its own export feature, both as an XML export and as a .ioc file. To reach these features, just navigate to an event and use the appropriate buttons on the right side.
Connecting to other instances
Apart from being a self contained repository of attacks/malware, one of the main features of MISP is its ability to connect to other instances and share (parts of) its information. The following options allow you to set up and maintain such connections.
Setting up a connection to another server
In order to share data with a remote server via pushes and pulls, you need to request a valid authentication key from the hosting organisation of the remote instance. When clicking on List Servers and then on New Server, a form comes up that needs to be filled out in order for your instance to connect to it. The following fields need to be filled out:
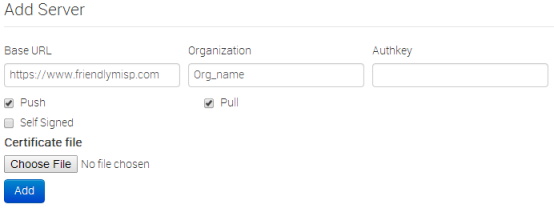
- Base URL: The URL of the remote server.
- Organization: The organisation that runs the remote server. It is very impoportant that this setting is filled out exactly as the organisation name set up in the bootstrap file of the remote instance.
- Authkey: The authentication key that you have received from the hosting organisation of the remote instance.
- Push: This check-box controls whether your server is allowed to push to the remote instance.
- Pull: This check-box controls whether your server can request to pull all data from the remote instance.
- Self Signed: Ticking this checkbox will allow syncing with instances using self-signed certificates.
- Certificate File: If the instance that you want to connect to has their entire own certificate chain, you can use this to import a .pem file with it and override CakePHP's standard root CA file.
If you are an administrator, trying to allow another instance to connect to your own, it is vital that two rules are followed when setting up a synchronisation account:
- The synchronisation user has to have the sync permission and full read/write/publish privileges turned on
- Both the sync user and the organisation setting in your instance's Config/bootstrap.php file have to match the organisation identifier of the hosting organisation.
Browsing the currently set up server connections and interacting with them
If you ever need to change the data about the linked servers or remove any connections, you have the following options to view and manipulate the server connections, when clicking on List Servers: (you will be able to see a list of all servers that your server connects to, including the base address, the organisation running the server the last pushed and pulled event IDs and the control buttons.).
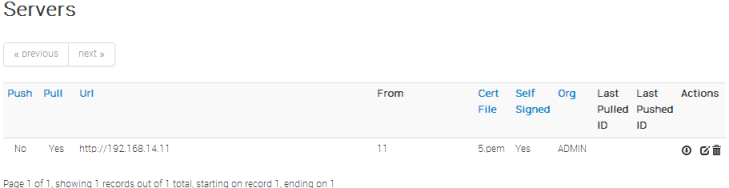
- Editing the connection to the instance: By clicking edit a view, that is identical to the new instance view, is loaded, with all the current information of the instance pre-entered.
- Deleting the connection to the instance: Clicking the delete button will delete the link to the instance.
- Push all: By clicking this button, all events that are eligible to be pushed on the instance you are on will start to be pushed to the remote instance. Events and attributes that exist on the far end will be updated.
- Pull all: By clicking this button, all events that are set to be pull-able or full access on the remote server will be copied to this instance. Existing events will not be updated.
Rest API
The platform is also RESTfull, so this means that you can use structured format (XML or JSON) to access Events data.
Requests
Use any HTTP compliant library to perform requests. You can choose which format you would like to use as input/output for the REST calls by specifying the Accept and Content-Type headers.
The following headers are required if you wish to receive / push XML data: Authorization: your authorisation key Accept: application/xml Content-Type: application/xml
The following headers are required if you wish to receive / push JSON data: Authorization: your authorisation key Accept: application/json Content-Type: application/json The following table shows the relation of the request type and the resulting action:
| HTTP format | URL | Controller action invoked |
|---|---|---|
| GET | /events | EventsController::index() |
| GET | /events/123 | EventsController::view(123) |
| POST | /events | EventsController::add() |
| PUT | /events/123 | EventsController::edit(123) |
| DELETE | /events/123 | EventsController::delete(123) |
| POST | /events/123 | EventsController::edit(123) |
*Attachments are included using base64 encoding below the data tag.
Example - Get single Event
In this example we fetch the details of a single Event (and thus also his Attributes). The request should be:
GET https://your_misp_url/events/123
And with the HTTP Headers:
Accept: application/xml
Authorization: your_api_key
The response you're going to get is the following data:
<pre><?xml version="1.0" encoding="UTF-8" standalone="no"?>;
<response>
    <Event>
        <id>57</id>
        <org>NCIRC</org>
        <date>2014-03-04</date>
        <threat_level_id>1</threat_level_id>
        <info>Code monkey doing code monkey stuff</info>
        <published>1</published>
        <uuid>50aa54aa-f7a0-4d74-910d-10f0ff32448e</uuid>
        <attribute_count>1</attribute_count>
        <analysis>1</analysis>
        <timestamp>1393327600</timestamp>
        <distribution>1</distribution>
        <proposal_email_lock>0</proposal_email_lock>
        <orgc>Iglocska</orgc>
        <locked>0</locked>
        <publish_timestamp>1393327600</publish_timestamp>
        <Attribute>
            <id>9577</id>
            <type>other</type>
            <category>Artifacts dropped</category>
            <to_ids>1</to_ids>
            <uuid>50aa54bd-adec-4544-b494-10f0ff32448e</uuid>
            <event_id>57</event_id>
            <distribution>1</distribution>
            <timestamp>1393327600</timestamp>
            <comment>This is an Attribute</comment>
            <value>Some_attribute</value>
            <ShadowAttribute />
        </Attribute>
        <ShadowAttribute />
        <RelatedEvent />
    </Event>
    <xml_version>2.2.0</xml_version>
</response>
Example - Add new Event
In this example we want to add a single Event. The request should be:
POST https://your_misp_url/events
Accept: application/xml
Authorization: your_api_key
And the request body:
<Event>
    <date>2014-03-04</date>
    <threat_level_id>1</threat_level_id>
    <info>Something concise</info>
    <published>1</published>
    <analysis>1</analysis>
    <distribution>1</distribution>
    <Attribute>
        <type>other</type>
        <category>Artifacts dropped</category>
        <to_ids>1</to_ids>
        <distribution>1</distribution>
        <comment>This is an Attribute</comment>
        <value>Some_attribute</value>
    </Attribute>
</Event>
The response you're going to get is the following data:
HTTP/1.1 100 Continue
HTTP/1.1 200 Continue
Date: Tue, 04-Mar-2014 15:00:00
Server: Apache/2.2.22 (Ubuntu) PHP/5.4.9-4ubuntu2.3
X-Powered-By: PHP/5.4.9-4ubuntu2.3
Set-Cookie: CAKEPHP=deleted; expires=Wed, 05-Mar-2014 15:00:00 GMT; path=/
Set-Cookie: CAKEPHP=a4ok3lr5p9n5drqj27025i4le3; expires Tue, 04-Mar-2014 15:00:00 GMT; path=/; HttpOnly
Content-Length: 1 kB
Content-Type: application/xml
<?xml version = "1.0" encoding = "UTF-8"?>
<response>
    <Event>
        <id>76</id>
        <org>NCIRC</org>
        <date>2014-03-04</date>
        <threat_level_id>1</threat_level_id>
        <info>Something concise</info>
        <published>1</published>
        <uuid>50aa54aa-f7a0-4d74-920d-10f0ff32448e</uuid>
        <attribute_count>1</attribute_count>
        <analysis>1</analysis>
        <timestamp>1393328991</timestamp>
        <distribution>1</distribution>
        <proposal_email_lock>0</proposal_email_lock>
        <orgc>Iglocska</orgc>
        <locked>0</locked>
        <publish_timestamp>1393947960</publish_timestamp>
        <Attribute>
            <id>10462</id>
            <type>other</type>
            <category>Artifacts dropped</category>
            <to_ids>1</to_ids>
            <uuid>50aa54bd-adec-4544-b412-10f0ff32448e</uuid>
            <event_id>76</event_id>
            <distribution>1</distribution>
            <timestamp>1393328991</timestamp>
            <comment/>
            <value>Some_attribute</value>
            <ShadowAttribute/>
        </Attribute>
        <ShadowAttribute/>
        <RelatedEvent>
            <id>75</id>
            <org>NCIRC</org>
            <date>2012-11-19</date>
            <info>Code monkey doing code monkey stuff</info>
            <uuid>50aa54aa-f7a0-4d74-910d-10f0ff32448e</uuid>
            <published>1</published>
            <analysis>1</analysis>
            <attribute_count>1</attribute_count>
            <orgc>Iglocska</orgc>
            <timestamp>1393327600</timestamp>
            <distribution>1</distribution>
            <proposal_email_lock>0</proposal_email_lock>
            <locked>0</locked>
            <threat_level_id>1</threat_level_id>
            <publish_timestamp>1393947655</publish_timestamp>
        </RelatedEvent>
    </Event>
    <xml_version>2.2.0</xml_version>
</response>
The response from requesting an invalid page
<?xml version = "1.0" encoding = "UTF-8"?>
<response>
    <name>Not Found</name>
    <url>/The_meaning_of_life</url>
</response>
Using TOTP/HOTP multi-factor authentication
MISP 2.4.172 introduced multi-factor authentication (TOTP/HOTP) support. For information on how to enable and configure this feature, please refer to the administration section.
Generating TOTP/HOTP tokens
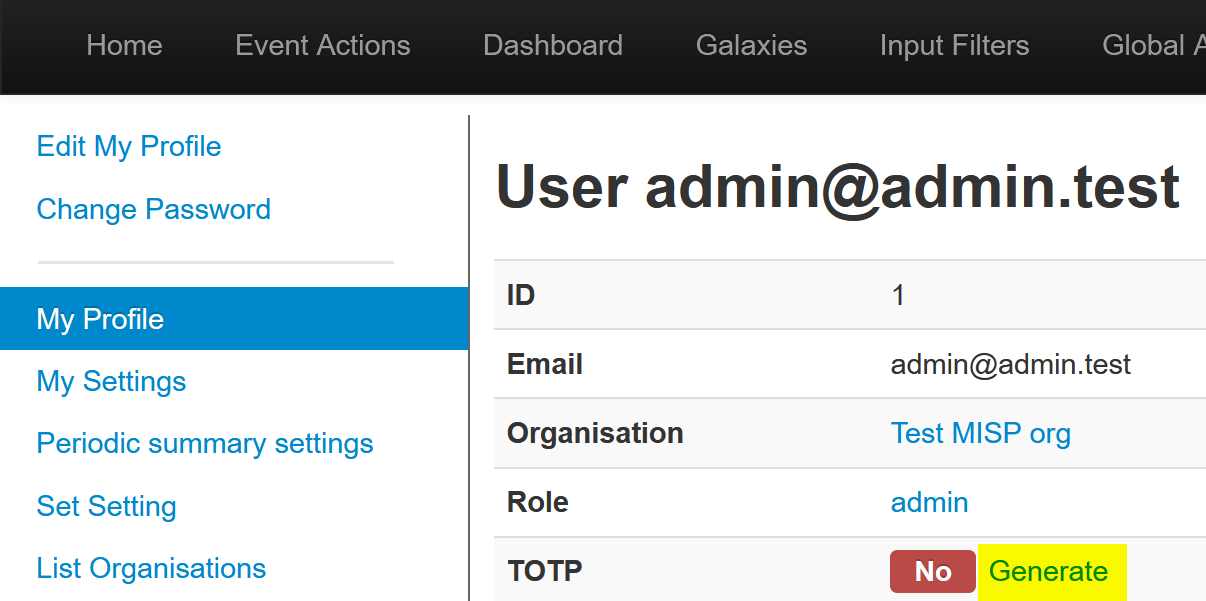
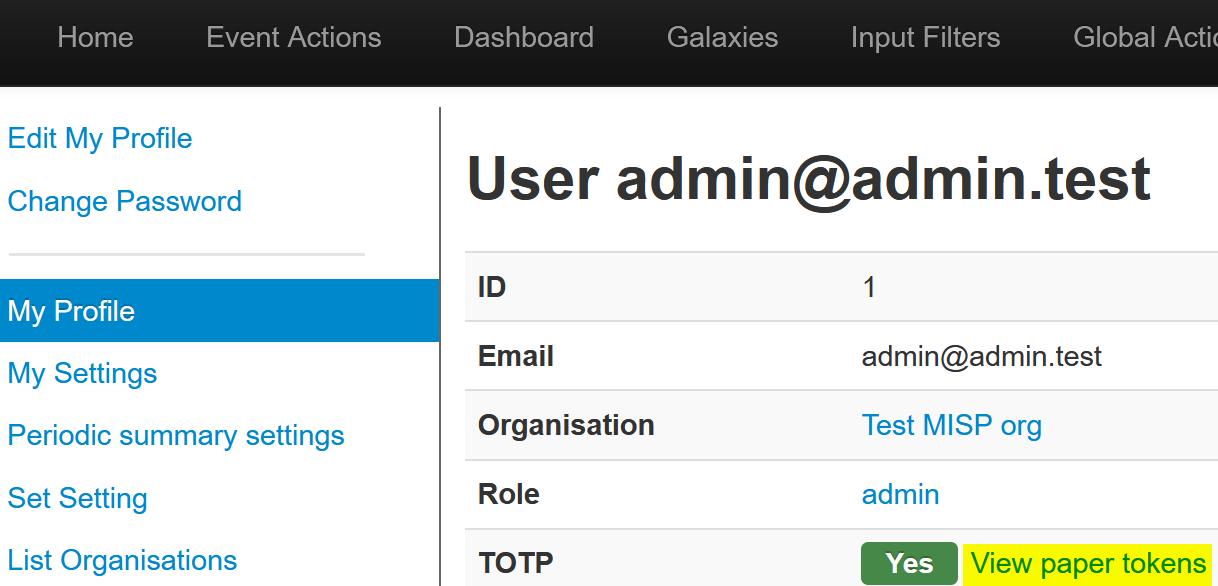
Using the top menu bar, navigate to Global Actions > My Profile. Click the TOTP Generate button.
You can then use your favorite TOTP application (for example: Winauth or Google authenticator) on the next screen. Validate the set up is done correctly by entering a verification code.
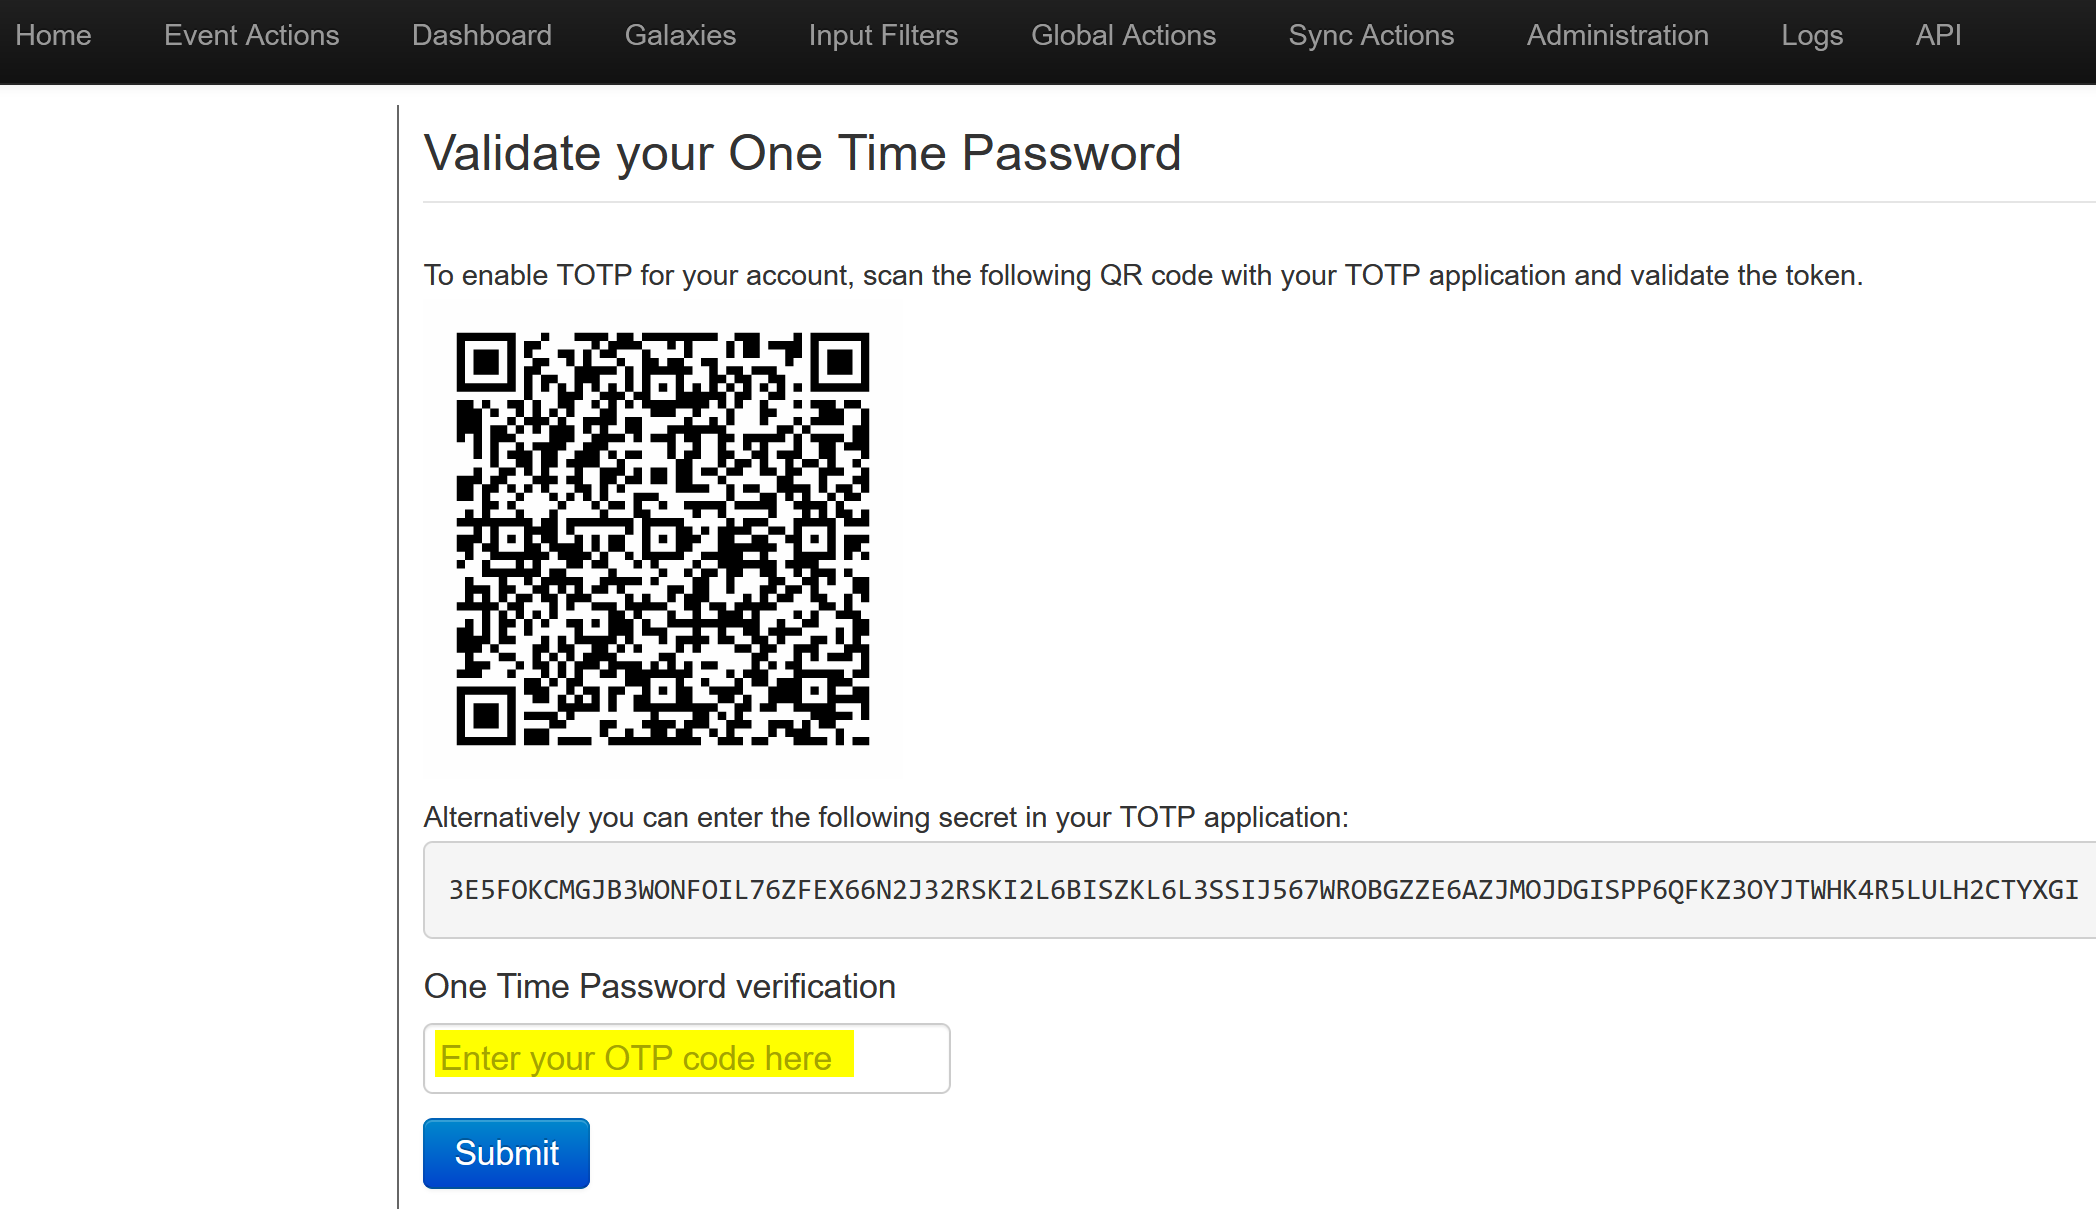
Once your set up has been validated, you will get redirected to a page containing your 50 HOTP/paper based tokens.
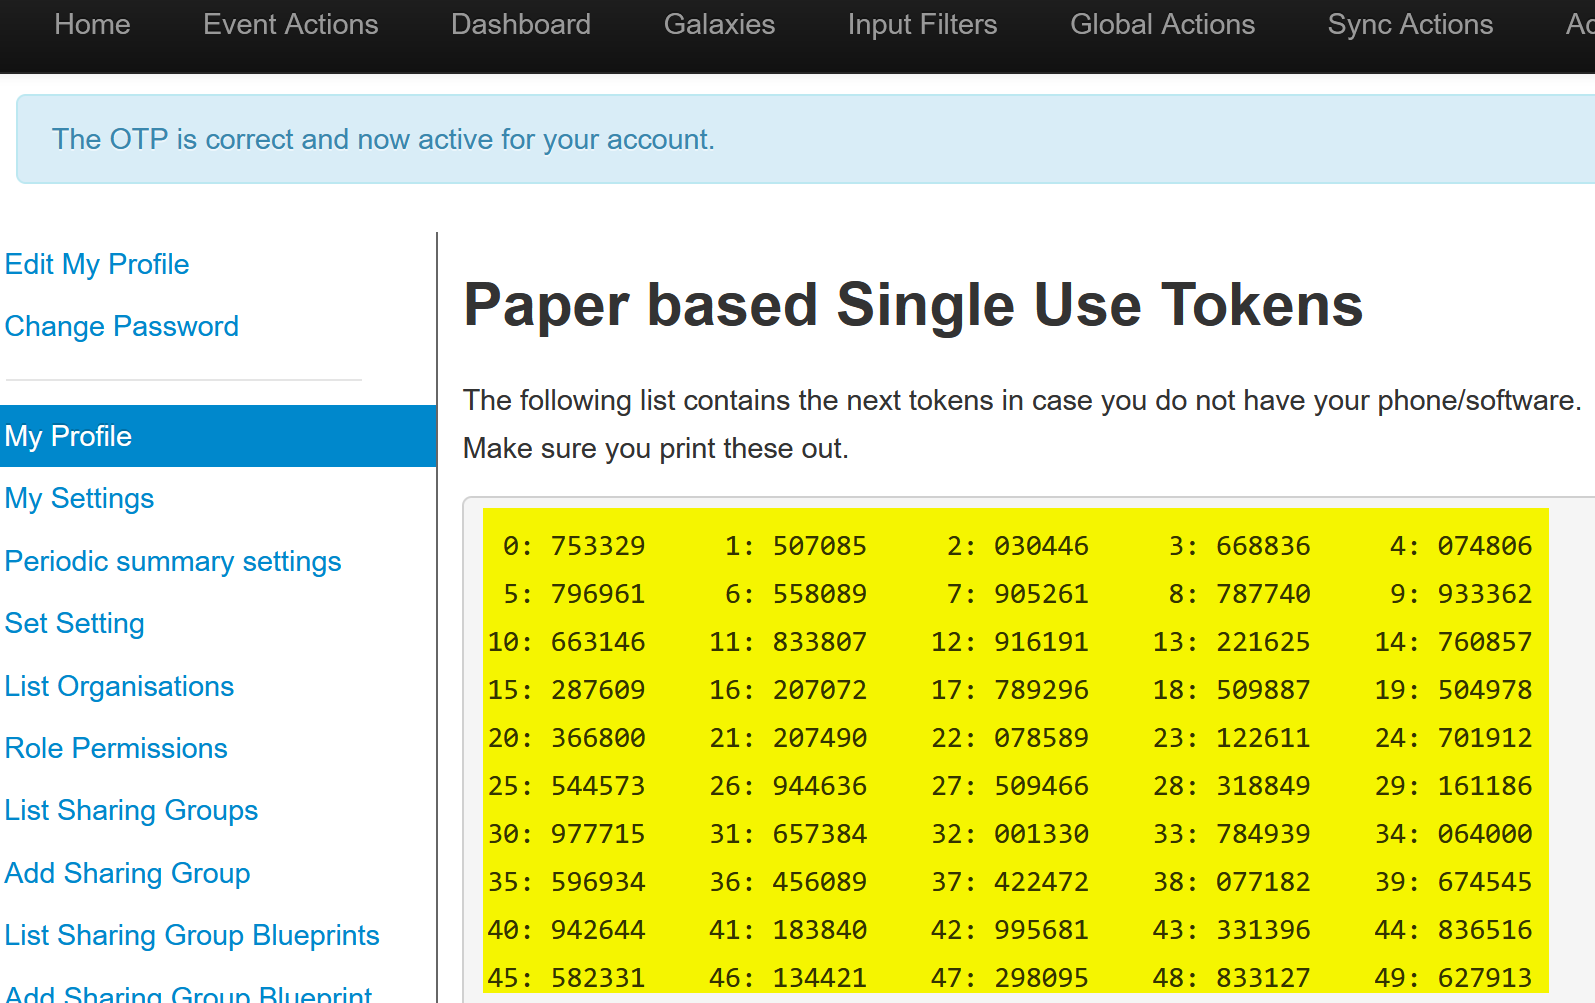
You can view these tokens again later, by going to your profile and clicking the View paper tokens button.
Logging in with TOTP/HOTP
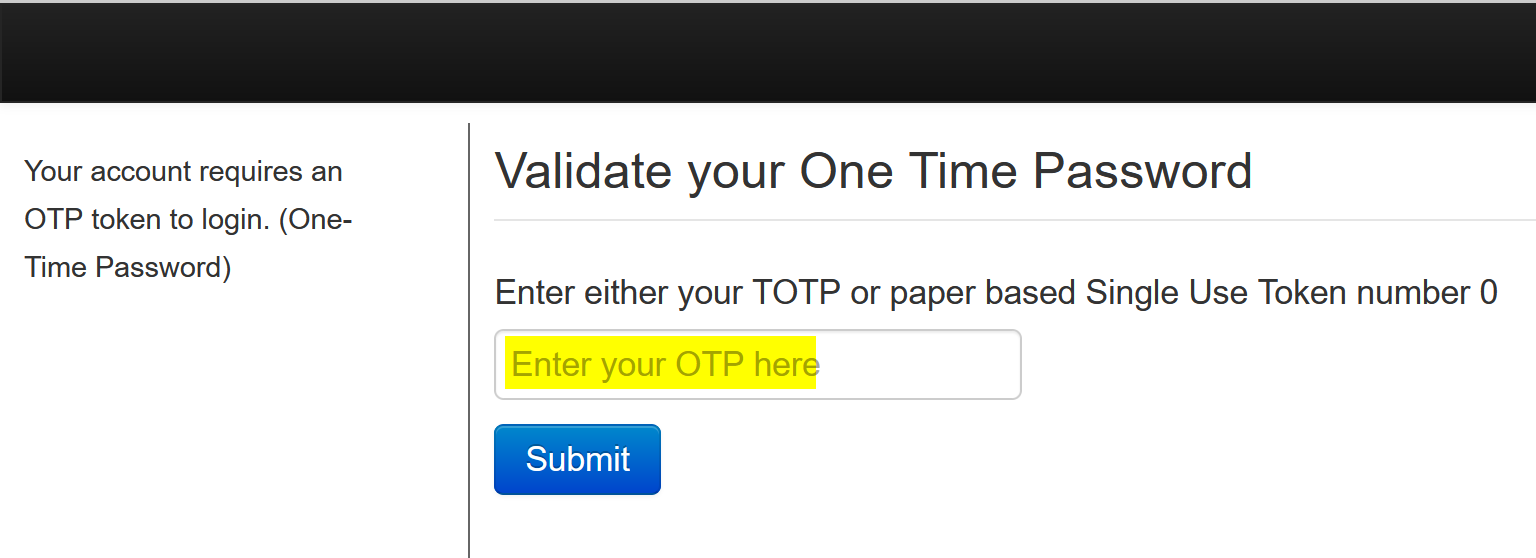
After setting up TOTP/HOTP for your account, you will be prompted for an OTP on future logins.
Deleting and re-generating TOTP/HOTP tokens
Deletion of the TOTP/HOTP setup for your user can only be done by site admins and organisation admins. Reach out to your org admin (preferred), or alternatively to a site admin of your instance, in case you want to set up new tokens.
Combining multiple forms of multi-factor authentication
It is currently not possible to combine multiple forms of multi-factor authentication. As an example: once your user has TOTP/HOTP assigned, you can't use e-mail OTP for it. If you are using a system which has e-mail OTP set up as well, e-mail OTP will be used again when your TOTP/HOTP setup is deleted.